Welcome to the help page
This page serves as a manual for functionality. If anything is missing please contact our support department via chat or mail at [email protected].
Short introduction to Validoku
The following video gives a basic introduction to Validoku, and shows you the ideal way of working. Additional features such as enabling and disabling documents are not discussed in this video.
Mass send (Bulk document creation)
In order to send your documents in bulk:
- you first need to create a document template.
- Your template must contain the same variables as in the data file (CSV) you are using in order to send the documents.
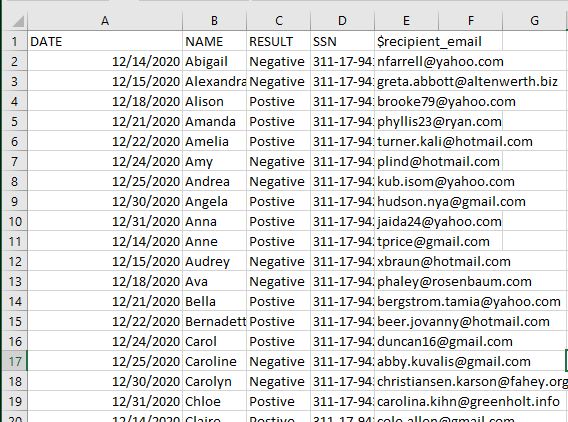
- Please make sure to add the
$reciepient_mailoperator in the CSV file as depicted below:
Next to mass sending, Validoku also offers the option to download all generated files in a zip format to send these documents by yourself. We highly recommend connecting your Microsoft Office 365 account to Validoku for mailing purposes, this is always the safest option: You can connect your this by selecting the mail option in the settings menu. It is best practice to create a new office 365 account for the e-mail address you wish to send mails with. We recommend using an email address that describes what you are using it for, such as for results or validation.
If you wish to use mass send follow the following steps:
Select bulk document creation in the document creation process.
Create your template and submit the template to Validoku. Remember to use the normal Validoku format for templates, and make sure that the fields in the template correspond with your CSV file.
- Example: Placing the following template syntax in your template
{NAME}will require a NAME field in your CSV file. Such as depicted in the following screenshot:
- Example: Placing the following template syntax in your template
In your CSV file, provide Validoku with the E-mails corresponding to the document owners.
- Make sure to add all required variables in your CSV file
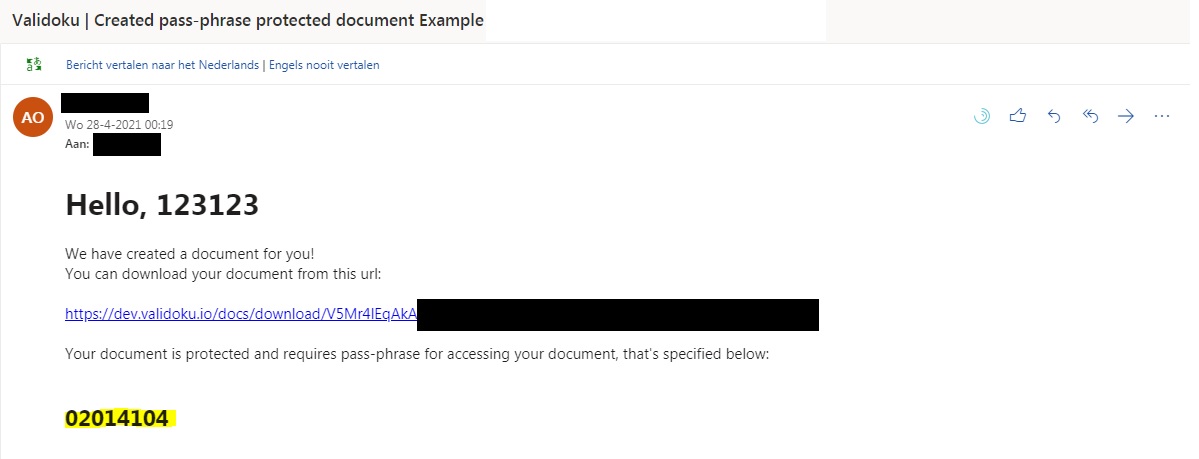
- If you require document protection; use the
$protection_enabledand the$protection_typeoperators. We have two protection types:- Passphrase - in the
$protection_typecolumn add phrase per row. This will send a passphrase per mail to your document owners. - Phone - in the
$protection_typecolumn add phone per row. This will send an SMS to your document owners, thus the$recipient_phoneoperator is also required per document owner with a phone number.
- Passphrase - in the
Process your CSV file with Validoku.
Select the mode of delivery:
- Automatic – With the automatic mode, Validoku will populate and deliver the documents for you.
- Manual – With the manual mode, Validoku will provide you with a zip file containing all documents, Validoku will ask you what CSV field to use as filename.
In the CSV files we support also different operators as depicted in the following table:
| Variable name | Charset/Format | Default | Description |
|---|---|---|---|
$recipient_email | RFC5322 | null | Recipient's email address. |
$recipient_name | [a-zA-Z0-9\-\_\.\'\"]+ | "Copy #{rowN}" | Recipient's name. |
$recipient_phone | E.164 | null | Recipient's phone. Used for 2FA |
$filename | Output filename | ||
$password | Password (passphrase) used for document encryption. Not recommended to override | ||
$protection_enabled | true/false | false | |
$protection_fields | "field1,field2,..."/document | document | Hide specified fields from validation page, requiring 2FA phrase or SMS code to view them |
$protection_type | phone/phrase | phrase | |
$protection_phrase | Generated [0-9]{8} | Used for $protection_type=phrase | |
$omit_fields | Populate template with specified fields, but omit them from the validation page |
Supported 2FA Methods for two-factor authentication
As an additional way to protect the data of your document owners, and protect the document against unauthorized scans of the QR code - Validoku has introduced two methods for two factor authentication. These features are only available in the pay as you go and Enteprise Plans:
- 2FA with SMS.
- 2FA One time code sent with the document.
Using SMS for two-factor authentication
By using this option the phone numbers of your document owners are required. This is used once a document is scanned: On the Validation page the scanning person will be prompted to enter a code prior to displaying the data. This code is received by the document owner by SMS, only this code will provide access to the document owners data on Validoku.
One time code sent with the document
Introduced as an alternative for SMS: By using this option, the email that contains the documents that you distribute to your document owners will contain a one time code. This code is used once a document is scanned: On the Validation page the scanning person will be prompted to enter a code prior to displaying the data. The one time code provided in the mail containing the document will provide access to the document owners data on Validoku.
E-mail templates
E-mail templates are used to customize the mails sent to your document owners.
To customize the mails sent to your document owners, Validoku is using the mustache.js template syntax. With this templating language almost anything is possible, even including your own images to your e-mails.
Validoku distinguishes between three kinds of mail:
Protected with passphrase:
These are documents you protect with 2FA using a password.
Protected with SMS:
These are documents you protect using 2FA with SMS.
Not protected:
These are unprotected documents.
To configure your custom mail, navigate to your settings page and select mail; here the three kinds of mail will be visible. But also the subject field; which is relevant for all the types of mail.
As you have probably seen by yourself, we have provided you with some templates per default; these fields are fully customizable using the mustache.js templating language.
The most important variables for your email are:
{{documentUrl}}Which will be populated with the URL to the document of the document owner. This is relevant for all protected documents.
{{name}}Which will use the name field from either your CSV or manually entered value. This is relevant for all documents.
{{phrase}}Which will display the password will be displayed to the document owner. Which is only relevant for documents which are protected with a password.
Please contact support if you require any further assistance with configuring your email template.